Hey everyone, hope you’re having an incredible day today. Today, we’re going to make a distinctive dish, veg parda biryani. It is one of my favorites. For mine, I will make it a bit tasty. This is gonna smell and look delicious.
Veg Parda Biryani is one of the most well liked of recent trending meals on earth. It is simple, it’s quick, it tastes yummy. It is enjoyed by millions daily. Veg Parda Biryani is something that I’ve loved my whole life. They are fine and they look wonderful.
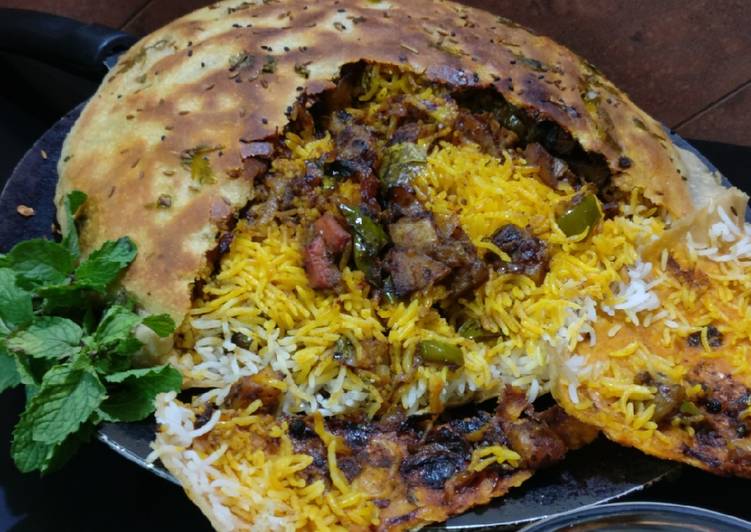
Vegetable parda biryani is an scrumptious dish made of soya nuggets,and mix vegetables cooked with a cover of puff paste sheets biryani of soya nuggets,and mix vegetables cooked with a cover of puff paste sheets. Biryani is a favorite rice dish through the Indian sub-continent. It's a spectacular recipe of range of spices, saffron and.
To get started with this recipe, we must first prepare a few components. You can have veg parda biryani using 28 ingredients and 15 steps. Here is how you cook that.
The ingredients needed to make Veg Parda Biryani:
- Make ready 2 cups basmati rice
- Get 3 cups water for cooking rice
- Prepare 1 Bay leaf/tej pata
- Take 2-3 laung/clove
- Get 1 stick cinnamon
- Prepare 2-4 black pepper corns
- Get 1/2 cup cauliflower chopped in cubes
- Prepare 1/2 cup onions chopped in cubes
- Take 1/2 cup Potato chopped in cubes
- Get 1/2 cup carrots chopped in cubes
- Make ready 1/2 cup French beans chopped in cubes
- Take 1/2 cup Green peas
- Take 50 gm Panner (optional)
- Get 1/2 cup capcicum chopped in cubes
- Prepare 3 tbsp Biryani masala
- Make ready 2 tsp red chilli powder
- Get 1 tsp turmeric powder
- Get 2 cups all-purpose flour/whole wheat flour
- Make ready to taste Salt
- Take as required oil
- Take 1 cup hung curd/thick Greek yogurt
- Get as required Oil
- Get Handful Mint leaves
- Make ready handful Coriander leaves
- Prepare 1 tsp Jeera (optional)
- Get 1 tsp Kalonji seeds/onion seeds (optional)
- Get 2 onions cut into long thin slices
- Take as required Keser strands soaked in 3 tbsp milk(optional)
I remember reading about Parda Biryani many years ago during one of my regular research work. I then was asking Vaishali about it as we had a discussion in the group. It became very popular as one of the most nutritious, rich and royal foods. Since the authentic hyderabadi biryani was dum cooked with meat, ghee, nuts and yogurt, it was considered as a nutritious and wholesome dish.
Instructions to make Veg Parda Biryani:
- Take all-purpose flour /whole wheat flour which ever you like. I took half whole wheat and half maida(all-purpose flour). Add oil, salt and Knead a soft dough. Keep aside.
- In a big mixing bowl, add all the vegetable of your choice. And all the vegetable should be half cooked. As the rest cooking will be done while in dum.
- Then add turmeric powder, red chilli powder, Biryani masala(homemade), salt and add curd and marinate the half cooked vegetables. I used 4 tbsp oil for marinating the vegetable, don't add curd for marinating. Add a little pinch of extra salt in marinate as when you add rice it will get balanced. (If you want you can use too.)
- In a kadhai, add water and let it come to a boil, then add bay leaves,cloves, Black pepper corns,and one small stick of cinnamon and then add the soaked rice (soak the basmati rice for 20 minutes)
- Cut two onion into long thin slices and fry them until golden brown. This will be used for garnishing the biryani.
- Prepare the kadhai in which we are going to place our biryani potli. Grease the kadhai with oil and add jeera and kalonji on it and sprinkle some coriander leaves. And prepare the ingredients for assembling the Biryani.
- Now dust the working area with some flour and roll out the roti. And slowly place it on the kadhai that we have prepared.
- Now start assembling. First add some chopped pudina leaves, then fried onions layer, then add the marinated vegetable, and add rice layer. Sprinkle some coriander leaves and pudina leaves.
- Repeat the same process. And here in the end you can drizzle keser milk on top before closing the potli. Just before starting the preparation just soak few strands of kesser in 3 tbsp milk.
- Now try to bring together the excess dough like shown in the picture.
- Brush the top with some oil. Then turn on the stove at slow flame. As we are cooking on dum we are going to first place a thick tawa under the kadhai and then cover the kadhai with a plate. And let it cook for roughly around 45 min.
- After 45 min, remove the top plate and put a tawa. As we have to flip and cook again the top part of our potli for another 20-30 minutes. After you flip successfully, place it back at the slow gas. To cook the top part of potli.
- Remove from the gas stove and remove the covered kadhai.be careful it will be hot
- Cut and open the roti layer with a knife and serve with any of your favourite raita.
- And you can also enjoy eating the roti layer that we used to stuff the Biryani.
There are sources that say "veg biryani" was born during the same time and was. Veg Biryani Recipe with step by step photos. Traditional method of making delicious hyderabadi vegetable dum biryani recipe. this is a tried & tested fool proof vegetable biryani recipe. the hyderabadi vegetable biryani recipe is light, a bit spiced, aromatic and deliciously yum. Vegetable parda biryani is an scrumptious dish made of soya nuggets,and mix vegetables cooked with a cover of puff paste sheets biryani of soya nuggets,and m. Parda biryani/ Chicken parda biryani is a delicious dum biryani prepared by layering partially cooked basmati rice over cooked chicken masala and coved with puff pastry sheet and baked to perfection.
So that’s going to wrap this up for this special food veg parda biryani recipe. Thank you very much for your time. I am confident that you can make this at home. There’s gonna be interesting food in home recipes coming up. Remember to save this page in your browser, and share it to your family, friends and colleague. Thank you for reading. Go on get cooking!